 A4 Front Page Studio
How to Convert Images Between JPG, PNG and WebP (and Shrink the File Size)
Sooner or later every student meets the same message: “File type not supported” or “Image must be under 200 KB.” An exam form wants a JPG, a design tool exports WebP, and the photo your phone took is far bigger than the upload limit. Understanding the three common image formats, JPG, PNG and WebP, makes these problems easy to solve in a minute. This guide explains what each format is good for, how to convert between them, how to resize and compress a photo to a target size and how to avoid ruining the quality along the way. It also shows the free Image Converter, which does all of this in your browser without uploading your pictures.
The three formats in plain words
| Format | Strengths | Weaknesses | Use it for |
|---|---|---|---|
| JPG | Small files, works everywhere | Lossy: detail is lost each time it is saved; no transparency | Photos, form uploads, email |
| PNG | Lossless and crisp, supports transparency | Larger files, especially for photos | Screenshots, logos, text-heavy pages, covers |
| WebP | Small files at good quality, transparency supported | Some older programs and forms do not accept it | Websites and modern apps |
If you are unsure, use JPG for photos and PNG for anything with text or sharp edges, such as a front page.
What lossy and lossless mean
A lossless format keeps every pixel exactly as it is. A lossy format throws away detail the eye is unlikely to notice, which makes the file much smaller. The catch is that the loss is permanent and grows each time you re-save, so keep your original and always convert from it, never from an already-converted copy.
Convert with the Image Converter
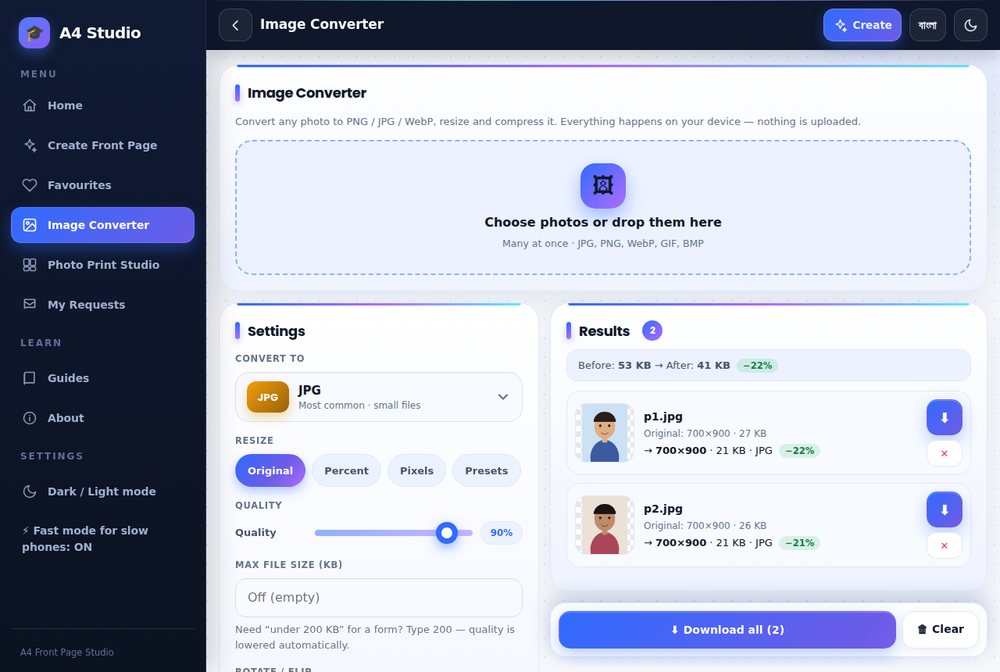
- Open the Image Converter and choose your photos, or drop them on the page. You can add many at once.
- Under Convert to, choose JPG, PNG or WebP.
- Set the size if needed: keep the original, use a percentage, enter exact pixels or pick a preset.
- Adjust the Quality slider for JPG and WebP.
- Check the result list, which shows the size before and after, then download one file or all of them.
Getting under a size limit such as 200 KB
Many online forms limit a photo or signature to around 50 to 200 KB. Work in this order:
- Resize first. A phone photo of 4000 pixels across is unnecessary for a form. Reducing it to around 800 to 1200 pixels cuts the size dramatically with little visible change.
- Choose JPG for photos.
- Lower the quality gradually, for example from 90 to 80 to 70, checking the picture each time. Stop as soon as it fits.
- Use the maximum file size field if you know the limit. Type the number of kilobytes and the tool lowers the quality until the file fits.
If quality drops too far, the face or text becomes blotchy; go back and shrink the pixel size more instead.
Rotate and flip
Photos taken on phones sometimes upload sideways. Use the rotate and flip controls before downloading so the file is the right way up.
Transparent backgrounds
PNG and WebP can hold transparent areas, but JPG cannot. If you convert a transparent PNG to JPG, the transparent area becomes a solid colour, usually white. For a logo you plan to place on a coloured page, keep it as PNG.
Which format for printing?
For a printed cover, use a PNG or PDF made at a high resolution, as explained in saving a front page as PDF or PNG. Do not shrink such a file to fit a chat app limit before printing, or the print will look soft; see fixing a blurry print.
Passport and ID photos
Application sites often have both a pixel range and a size limit. Convert to JPG, set the exact pixel size the site asks for, and then reduce the quality only until it fits. If you also need a printed sheet, use the Photo Print Studio.
Privacy
The Image Converter runs in your browser. The photos stay on your device and are not sent to a server, which matters for ID photos and signatures. Always be careful with online converters that upload your files.
Mistakes to avoid
- Converting a JPG to PNG and expecting better quality; it only makes the file bigger
- Re-saving the same JPG many times
- Shrinking only by quality instead of resizing the pixels first
- Renaming .webp to .jpg by hand instead of converting; the file may still fail
- Deleting the original photo
Quick answers
Is WebP better than JPG?
It often gives a smaller file at similar quality, but fewer forms accept it. Use JPG when compatibility matters.
Why is my PNG so big?
PNG keeps every pixel. Photos compress better as JPG or WebP.
Does converting lose quality?
Converting to JPG or WebP at lower quality does. Converting to PNG does not add loss, but cannot restore what was already lost.
Keep your original, resize before compressing, pick JPG for photos and PNG for sharp graphics, and check the result before you upload. That solves nearly every image-format error you will meet.
Open the free A4 Front Page Studio →