 A4 Front Page Studio
How to Print Passport Size Photos at Home on an A4 Sheet
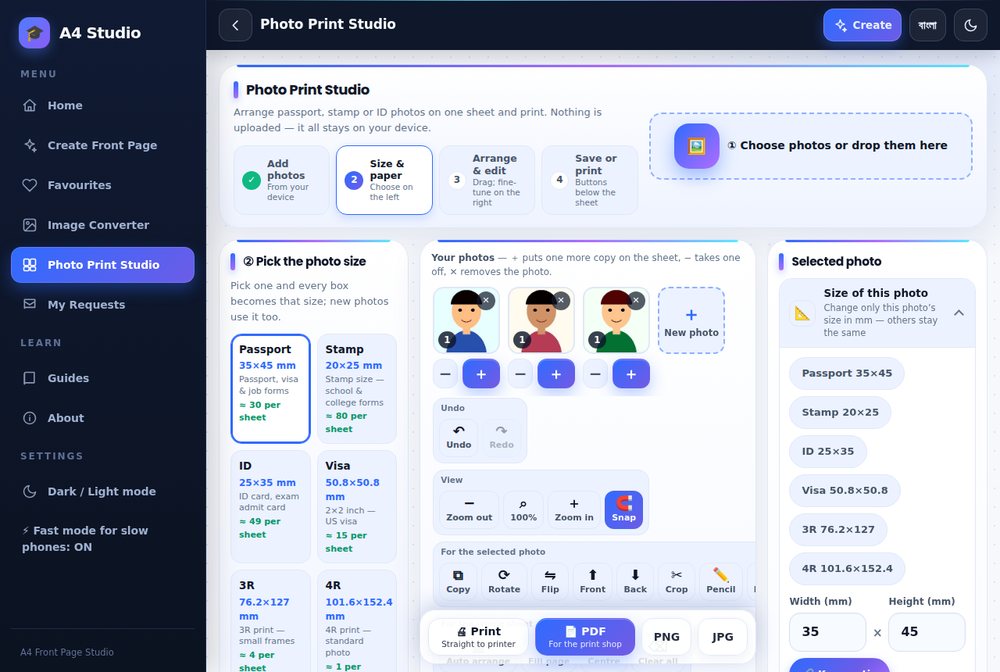
Needing a few passport photos is one of those small errands that eats an hour: find a studio, wait, pay for a set of eight when you needed two. If you already have a good photo on your phone, you can lay out a whole sheet of passport, stamp or ID photos on a single A4 page and print it yourself, or take the sheet to any print shop for a fraction of the cost. This guide explains how to prepare the photo, which sizes are common, how to arrange them on a sheet, which paper to use and how to cut neatly. It also shows the Photo Print Studio built into A4 Front Page Studio, which does the layout in your browser without uploading anything.
- Check what your office actually requires
- Common photo sizes
- Step 1: Take or pick a good photo
- Step 2: Load it into the Photo Print Studio
- Step 3: Choose size, paper and layout
- Step 4: Crop the face correctly
- Step 5: Paper and print settings
- Step 6: Print, or save for the shop
- Step 7: Cut neatly
- Common problems
- Quick answers
Check what your office actually requires
Before you print anything, find the photo rules of the office that will receive it. Passport offices, visa centres, exam boards and schools each have their own requirements for size, background colour, face position and whether you may wear glasses. Rules also change over time. Read the official instructions or the application form, and treat anything in this guide as general layout help, not as an official specification. If your photo is rejected, it is almost always because of background, lighting or size, not because of the printer.
Common photo sizes
| Name | Size | Typical use |
|---|---|---|
| Passport | 35 × 45 mm | Passports and many job or visa forms in India, the UK and Europe |
| Stamp | 20 × 25 mm | School and college forms |
| ID | 25 × 35 mm | ID cards and exam admit cards |
| Visa (square) | 50.8 × 50.8 mm (2 × 2 in) | US-style visa and passport photos |
| 3R / 4R | 76.2 × 127 mm / 101.6 × 152.4 mm | Larger prints for albums or frames |
The tool lists these presets and lets you type your own width and height in millimetres, which helps when a form asks for an unusual size.
Step 1: Take or pick a good photo
- Stand in front of a plain, light wall in soft daylight, not under a harsh bulb.
- Face the camera straight on with a neutral expression and both eyes open.
- Ask someone to take the photo at eye level, from about a metre and a half away, so the face is not distorted.
- Avoid shadows on the face or the wall behind you.
- Use the original camera file, not a copy from a chat app, because those are compressed.
Step 2: Load it into the Photo Print Studio
Open the Photo Print Studio, choose your photo or drop it into the page. You can add several photos at once, for example one for each family member. Nothing is uploaded; the photos stay on your device.
Step 3: Choose size, paper and layout
Pick the photo size from the list, or enter your own. Then choose the paper, usually A4 for a home printer. The tool fills the sheet with copies and shows roughly how many fit. If you want different people on one sheet, set how many copies each photo gets. You can drag photos to move them, zoom, rotate, flip, crop and bring one photo in front of another, and there is Undo and Redo if you change your mind.
Step 4: Crop the face correctly
Crop so the head sits in the centre, with a little space above the hair and the shoulders partly visible. Keep the same crop for every copy so the sheet looks even. If you must resize the photo, do not stretch it; change the crop instead, otherwise the face looks wide or thin.
Step 5: Paper and print settings
- Photo paper (glossy or matte) gives the best result and is what many offices prefer. Plain paper is acceptable only if the office allows it.
- Set paper size to A4, scale to 100 per cent or Actual size, and quality to High or Photo.
- Choose the paper type in the printer dialog to match what is loaded.
- Print one sheet on plain paper first and measure a photo with a ruler to confirm the size.
The details of the print dialog are in how to print an A4 page correctly.
Step 6: Print, or save for the shop
You can print straight from the tool, or save the sheet as a PDF, PNG or JPG and take it to a shop. For a shop, the PDF is the safest because it keeps the A4 size. If the file is too large to send, shrink it with the Image Converter; see converting JPG, PNG and WebP.
Step 7: Cut neatly
- Use a metal ruler and a sharp craft knife on a cutting mat, or a paper trimmer, for straight edges.
- Cut along the thin guide lines between photos, not through the faces.
- Cut one line the whole way across the sheet, then cut across.
- Trim off the outer margin last.
Common problems
- Photos come out too small or too large: the page was scaled. Print at 100%.
- Face looks stretched: the photo was resized without keeping proportions. Recrop it.
- Colours look yellow or pink: the lighting was warm; retake the photo in daylight.
- Soft, blurry faces: the original photo was small. Use the full-size camera file, and see fixing blurry prints.
Quick answers
Will an office accept a home-printed photo?
Many do, but some require photos printed on photo paper or taken at a studio. Check the form first.
Can I smile?
Rules vary. Many offices ask for a neutral expression; check yours.
Is my photo stored online?
The tool works in your browser and does not upload your photos. See the privacy policy for details.
Check the official rules, take one good photo in daylight, set the size and paper in the studio, print a test on plain paper and then print the real sheet. You will have a full set of photos in less time than it takes to reach a studio.
Open the free A4 Front Page Studio →